
Not so long ago I started exploring server-side rendered single-page applications. Yeah, try saying that three times fast. Building products for startups has taught me SEO is a must if you want an online presence. But, you also want the performance SPAs can provide.
We want the best of both worlds. The SEO boost server-side rendering provides, and the speed of a Single Page Application. Today I'll show you all this while hosting it basically for free in a serverless environment on AWS Lambda.
TL;DR
Let's run through what this tutorial will cover. You can skim through and jump to the section that interest you. Or, be a nerd and keep reading. * whisper * Please be a nerd.
- What're we building?
- Configure and install dependencies
- Build the app with the Serverless Framework and Next.js
- Deploy the app to AWS Lambda
Note: The code we will write is already on GitHub if you need further reference or miss any steps, feel free to check it out. The guys over at Cube.js gave me a quick rundown of React before I started writing this tutorial. They have a serverless analytics framework that plugs nicely into React. Feel free to give it a try.
What're we building?
Well, a blazing-fast React application of course! The cost of every SPA is lousy SEO capabilities though. So we need to build the app in a way to incorporate server-side rendering. Sounds simple enough. We can use Next.js, a lightweight framework for static and server-rendered React.js applications.
To accomplish this we need to spin up a simple Express server and configure the Next app to serve files through Express. It is way simpler than it sounds.
However, from the title you can assume we don't like the word server in my neighborhood. The solution is to deploy this whole application to AWS Lambda! It is a tiny Node.js instance after all.
Ready? Let's get crackin'!
Configure and install dependencies
As always, we're starting with the boring part, setting up the project and installing dependencies.
1. Install the Serverless Framework
In order for serverless development to not be absolute torture, go ahead and install the Serverless framework.
Note: If you’re using Linux or Mac, you may need to run the command as sudo.
Once installed globally on your machine, the commands will be available to you from wherever in the terminal. But for it to communicate with your AWS account you need to configure an IAM User. Jump over here for the explanation, then come back and run the command below, with the provided keys.
Now your Serverless installation knows what account to connect to when you run any terminal command. Let’s jump in and see it in action.
2. Create a service
Create a new directory to house your Serverless application services. Fire up a terminal in there. Now you’re ready to create a new service.
What’s a service you ask? View it like a project. But not really. It’s where you define AWS Lambda functions, the events that trigger them and any AWS infrastructure resources they require, all in a file called serverless.yml.
Back in your terminal type:
The create command will create a new service. Shocker! But here’s the fun part. We need to pick a runtime for the function. This is called the template. Passing in aws-nodejs will set the runtime to Node.js. Just what we want. The path will create a folder for the service.
3. Install npm modules
Change into the ssr-react-next folder in your terminal. There should be three files in there, but for now, let's first initialize npm.
After the package.json file is created, you can install a few dependencies.
These are our production dependencies, and I'll go into more detail explaining what they do a bit further down. The last one, called serverless-domain-manager will let us tie a domain to our endpoints. Sweet!
Now, your package.json should look something like this.
We also need to add two scripts, one for building and one for deploying the app. You can see them in the scripts section of the package.json.
4. Configure the serverless.yml file
Moving on, let's finally open up the project in a code editor. Check out the serverless.yml file, it contains all the configuration settings for this service. Here you specify both general configuration settings and per function settings. Your serverless.yml will be full of boilerplate code and comments. Feel free to delete it all and paste this in.
The functions property lists all the functions in the service. We will only need one function because it will run the Next app and render the React pages. It works by spinning up a tiny Express server, running the Next renderer alongside the Express router and passing the server to the serverless-http module.
In turn, this will bundle the whole Express app into a single lambda function and tie it to an API Gateway endpoint. Under the functions property, you can see a server function that will have a handler named server in the index.js file. API Gateway will proxy any and every request to the internal Express router which will then tell Next to render our React.js pages. Woah, that sounds complicated! But it's really not. Once we start writing the code you'll see how simple it really is.
We've also added two plugins, the serverless-apigw-binary for letting more mime types pass through API Gateway and the serverless-domain-manager which lets us hook up domain names to our endpoints effortlessly.
We also have a custom section at the bottom. The secrets property acts as a way to safely load environment variables into our service. They're later referenced by using ${self:custom.secrets.<environment_var>} where the actual values are kept in a simple file called secrets.json.
Apart from that, we're also letting the API Gateway binary plugin know we want to let all types through, and setting a custom domain for our endpoint.
That's it for the configuration, let's add the secrets.json file.
5. Add the secrets file
Add a secrets.json file and paste this in. This will keep us from pushing secret keys to GitHub.
Now, only by changing these values you can deploy different environments to different stages and domains. Pretty cool.
Build the app with the Serverless Framework and Next.js
To build a server-side rendered React.js app we'll use the Next.js framework. It lets you focus on writing the app instead of worrying about SEO. It works by rendering the JavaScript before sending it to the client. Once it's loaded on the client side, it'll cache it and serve it from there instead. You have to love the speed of it!
Let's start by writing the Next.js setup on the server.
1. Setting up the Next.js server(less)-side rendering
Create a file named server.js. Really intuitive, I know.
It's pretty simple. We're grabbing Express and Next, creating a static route with express.static and passing it the directory of the bundled JavaScript that Next will create. The path is /_next, and it points to the .next folder.
We'll also set up the server-side routes and add a catch-all route for the client-side renderer.
Now, the app needs to be hooked up to serverless-http and exported as a lambda function. Create an index.js file and paste this in.
As you can see we also need to create binaryMimeTypes.js file to hold all the mime types we want to enable. It'll just a simple array which we pass into the serverless-http module.
Sweet, that's it regarding the Next.js setup. Let's jump into the client-side code!
2. Writing client-side React.js
In the root of your project create three folders named, components, layouts, pages. Once inside the layouts folder, create a new file with the name default.js, and paste this in.
The default view will have a <Meta /> component for setting the metatags dynamically and a <Navbar/> component. The { children } will be rendered from the component that uses this layout.
Now add two more files. A navbar.js and a meta.js file in the components folder.
This is an incredibly simple navigation that'll be used to navigate between some cute dogs. It'll make sense once we add something to the pages folder.
The meta.js will make it easier for us to inject values into our meta tags. Now you can go ahead and create an index.js file in the pages folder. Paste in the code below.
The index.js file will be rendered on the root path of our app. It calls a dog API and will show a picture of a cute dog.
Let's create more routes. Create a sub-folder called dogs and create an index.js file and a _breed.js file in there. The index.js will be rendered at the /dogs route while the _breed.js will be rendered at /dogs/:breed where the :breed represents a route parameter.
Add this to the index.js in the dogs directory.
And, another snippet in the _breed.js file in the dogs folder.
As you can see in the Default component we're injecting custom meta tags. It will add custom fields in the <head> of your page, giving it proper SEO support!
Note: If you're stuck, here's what the code looks like in the repo.
Let's deploy it and see if it works.
Deploy the app to AWS Lambda
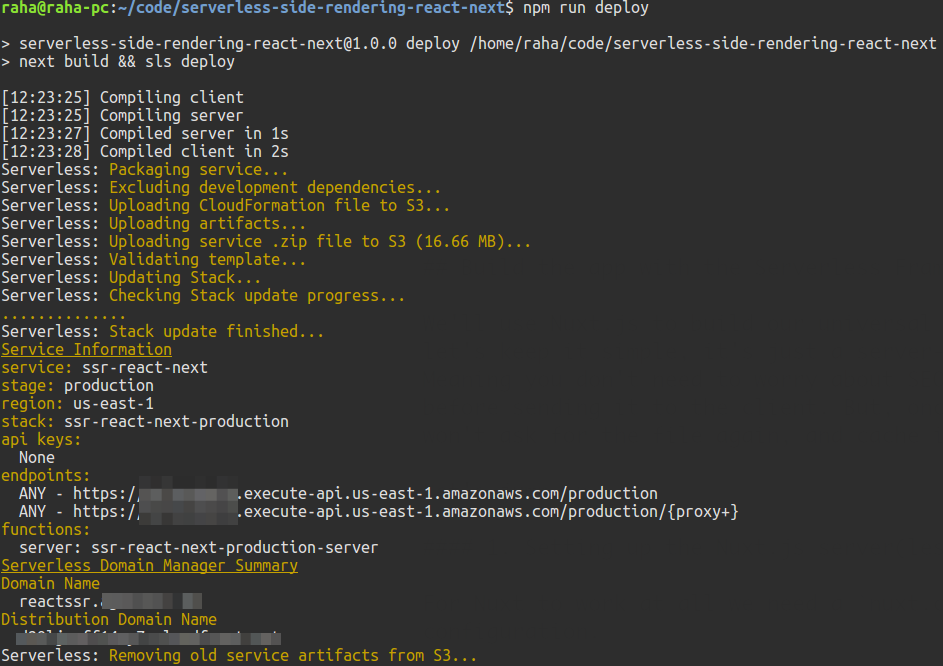
At the very beginning, we added a script to our package.json called deploy. It'll build the Next app and deploy the serverless service as we specified in the serverless.yml.
All you need to do is run:
The terminal will return output with the endpoint for your app. We also need to add the domain for it to work properly. We've already added the configuration in the serverless.yml but there's one more command we need to run.
This will create a CloudFront distribution and hook it up to your domain. Make sure that you've added the certificates to your AWS account. It usually takes around 20 minutes for AWS to provision a new distribution. Rest your eyes for a moment.
Once you're back, go ahead and deploy it all again.
It should now be tied up to your domain. Here's what it should look like.
Nice! The app is up-and-running. Go ahead and try it out.
Wrapping up
This walkthrough was a rollercoaster of emotions! It gives you a new perspective into creating fast and performant single-page apps while at the same time keeping the SEO capabilities of server-rendered apps. However, with a catch. There are no servers you need to worry about. It's all running in a serverless environment on AWS Lambda. It's easy to deploy and scales automatically. Doesn't get any better.
If you got stuck anywhere take a look at the GitHub repo for further reference, and feel free to give it a star if you want more people to see it on GitHub.
If you want to read some of my previous serverless musings head over to my profile or join my newsletter!
Or, take a look at a few of my articles right away:
- A crash course on Serverless with AWS - Building APIs with Lambda and Aurora Serverless
- A crash course on Serverless with AWS - Image resize on-the-fly with Lambda and S3
- A crash course on Serverless with AWS - Triggering Lambda with SNS Messaging
- A crash course on serverless-side rendering with Vue.js, Nuxt.js and AWS Lambda
- Building a serverless contact form with AWS Lambda and AWS SES
- A crash course on Serverless APIs with Express and MongoDB
- Solving invisible scaling issues with Serverless and MongoDB
- How to deploy a Node.js application to AWS Lambda using Serverless
- Getting started with AWS Lambda and Node.js
- A crash course on securing Serverless APIs with JSON web tokens
- Migrating your Node.js REST API to Serverless
- Building a Serverless REST API with Node.js and MongoDB
- A crash course on Serverless with Node.js
I also highly recommend checking out this article about Next.js, and this tutorial about the serverless domain manager.
Hope you guys and girls enjoyed reading this as much as I enjoyed writing it. Until next time, be curious and have fun.


