Ever since AWS made a serverless option of AWS RDS Aurora generally available, I've been on the edge of my seat, eagerly anticipating all the various possibilities. It would mean a breakthrough in building serverless architectures. No more managing connection pools with SQL. No more worrying about capping out available connections. This would make it viable to use serverless for database intensive operations.
I wrote an article a while back explaining how to build a serverless API with MongoDB. But, I saw a pattern emerge. Higher throughput in a system, even though a database instance could take the load, would cause connections to drop because of a limited set of available connections.
TL;DR
I've refactored the example with MongoDB to use SQL. It's agnostic regarding which database provider you use, but the example I'll show here is with AWS Aurora Serverless. Check out the code here, or if you want to follow along and learn how to set up everything yourself, keep reading.
What'll we be doing?
This article will show you how to hook up a MySQL database as a service to a serverless API. We'll create a database cluster with AWS RDS and configure Aurora Serverless. What’s awesome with this set up is that you'll pay for the services based on how much you use them. Even the database! It's the ideal serverless scenario.
What if you're new to this?
Let's break down the basics. We'll use AWS Lambda as the compute service. An AWS Lambda function is basically a container. Once the Lambda is invoked, the container spins up and runs the code. This is when we want to initialize the database connection, the first time the function is invoked, when the container is first initialized. Every subsequent request to the lambda function will use the existing database connection. Sounds quite simple once I break it down. Let's jump in.
Configuring the project
I’ll assume you already have a basic understanding of the Serverless Framework. I would also hope you have an AWS account set up. If you don’t, please check this out.
1. Creating a service
As always we need a fresh service to hold all our code.
Running this command, you'll get a nice boilerplate to begin developing your functions. It'll set up the basic functions and event triggers. You also see we're entering the web-api directory right away. We jumped into this directory to set up the required dependencies.
2. Installing modules
In total, we only need three dependencies. The MySQL ORM called Sequelize to handle connections and map relations, and serverless-offline for local development.
Make sure you’re in the web-api directory. First, install serverless-offline, then mysql2 and sequelize.
That’s it, let’s take a break from the terminal and jump over to AWS to create a database cluster.
3. Creating a database on AWS RDS
I've always hated setting up resources through a web console, but it's a necessary evil. Bare with me, jump over to your AWS account and choose RDS. You'll land on a page similar to this one.
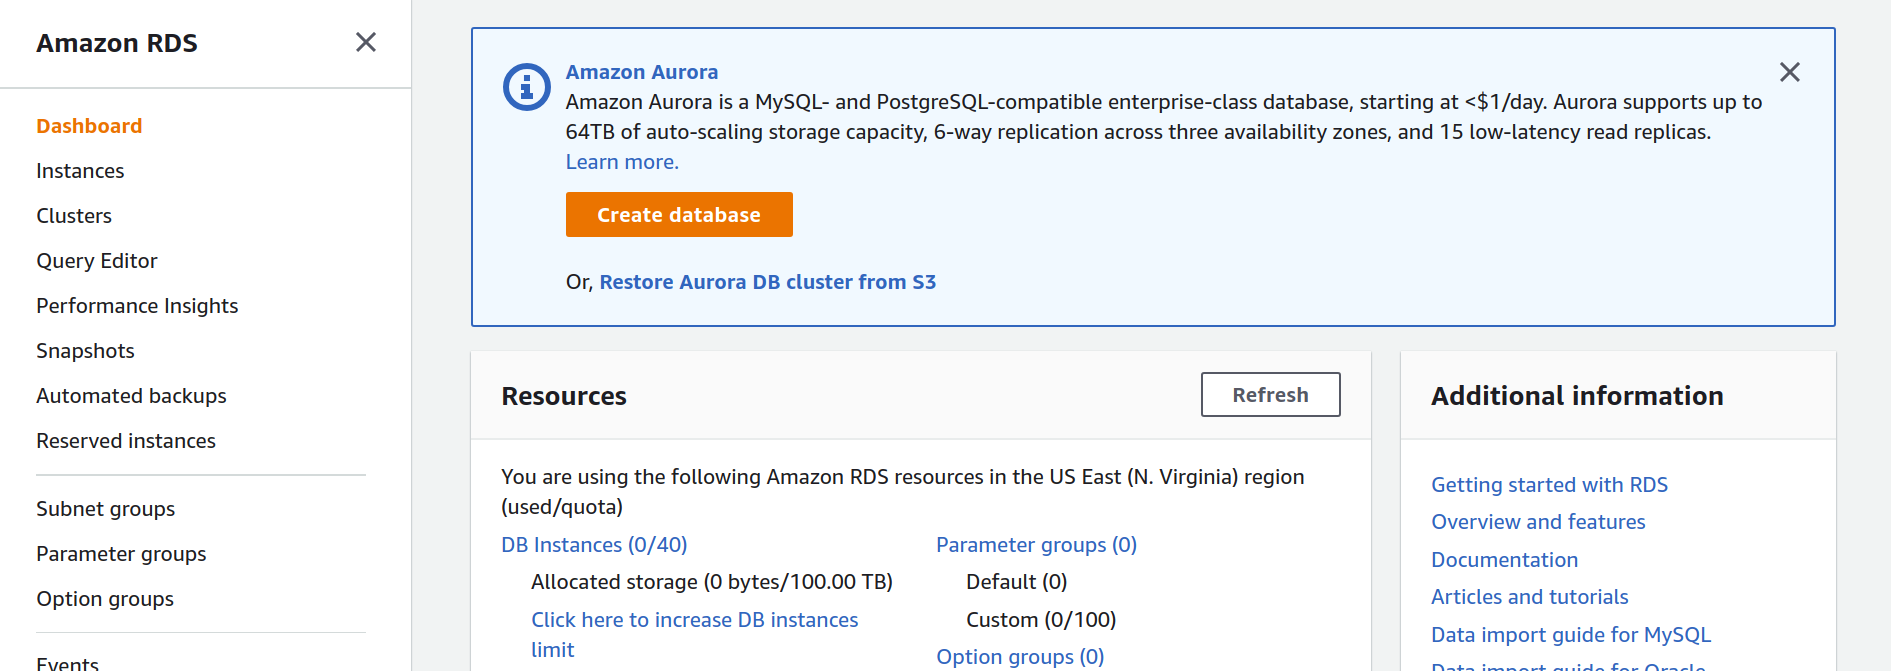
Click the orange Create Database button and follow along.
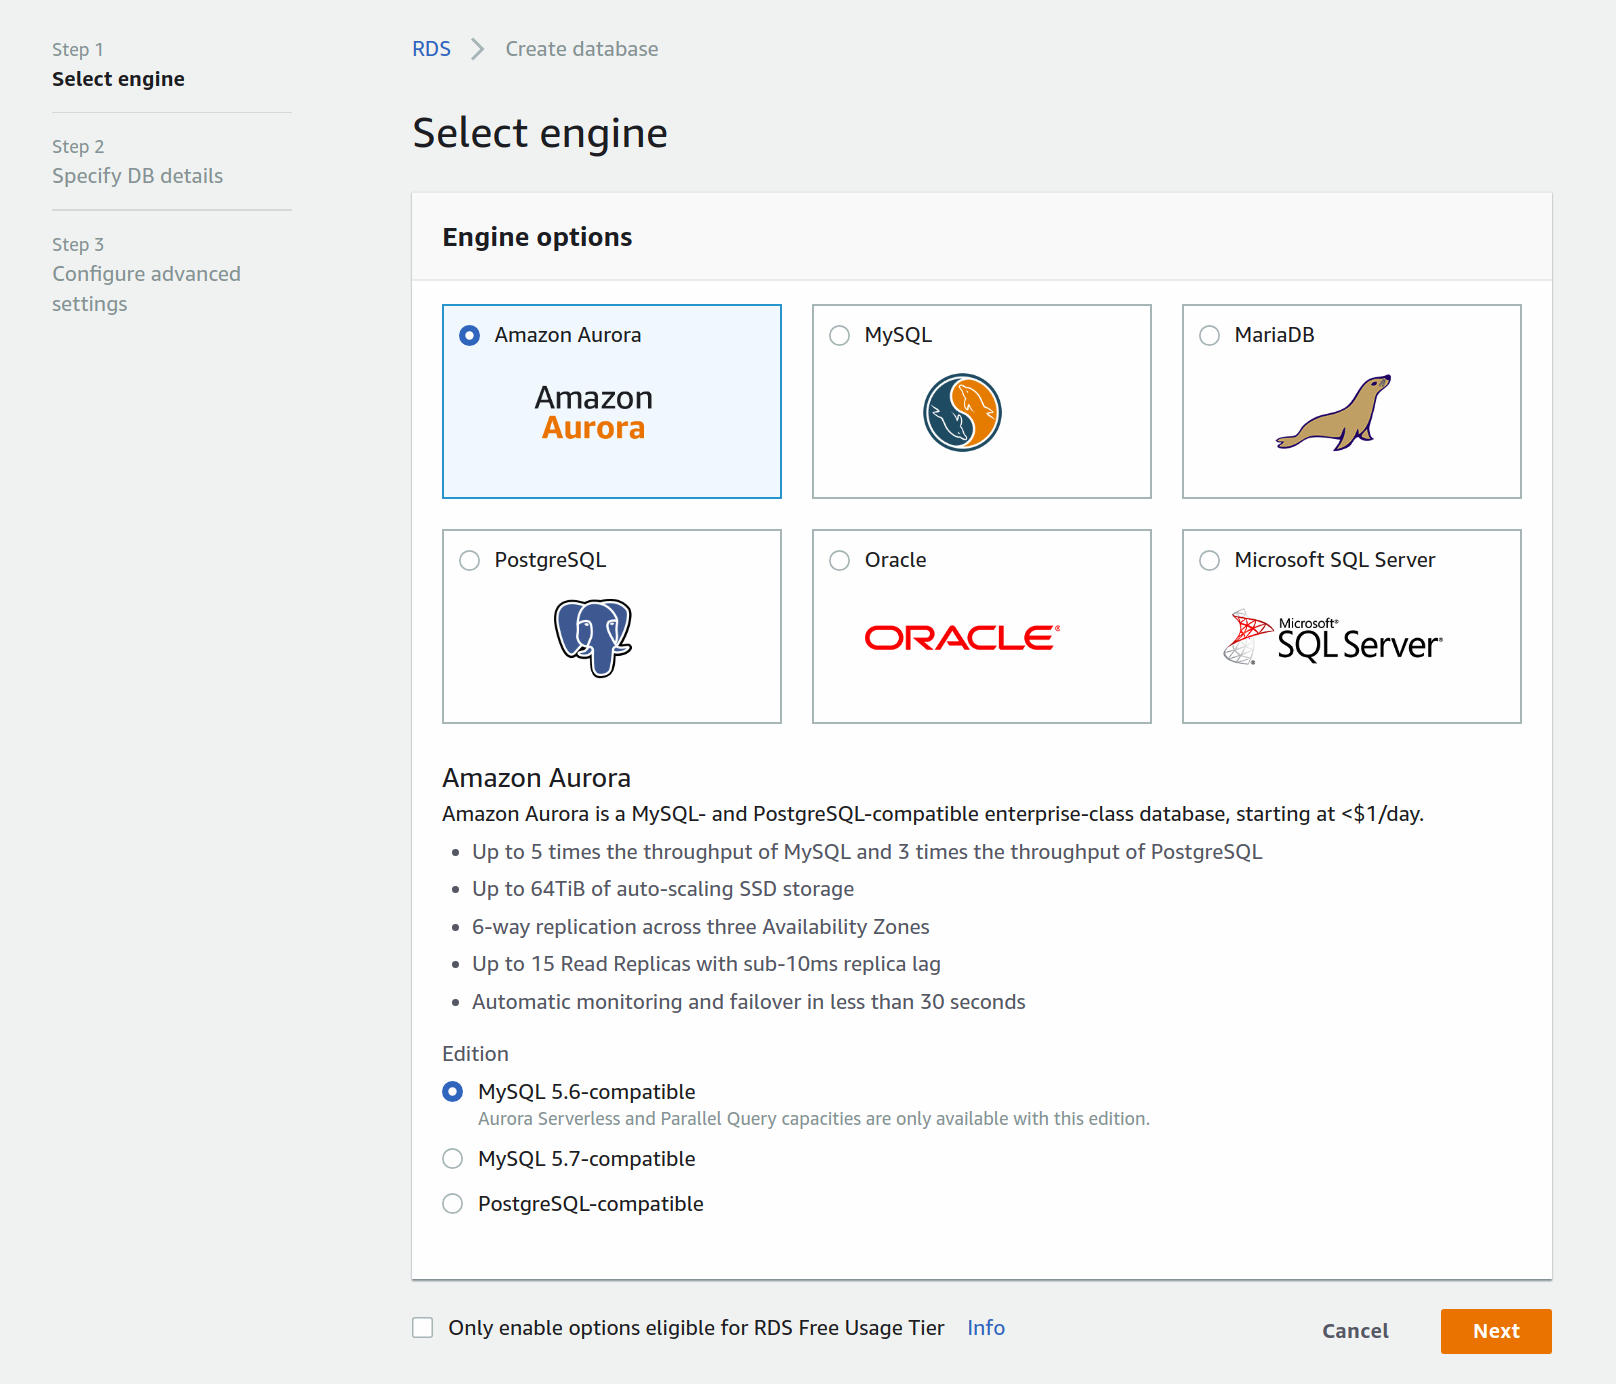
First, you'll choose the engine you want to use. Choose Amazon Aurora and click next.

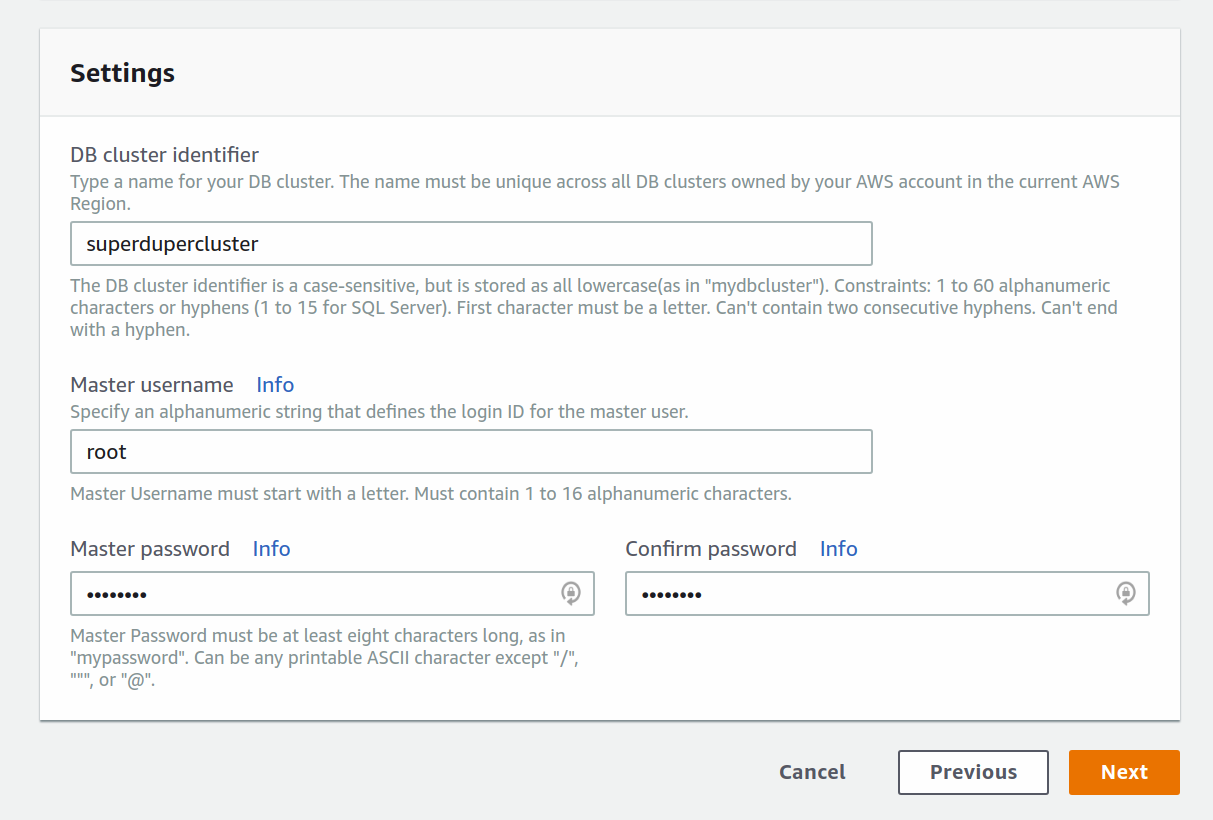
Once you've specified the engine, configure Aurora to be Serverless, add a name to your cluster and configure the master username and password.
Only one more set of advanced settings to configure, and you should be set.
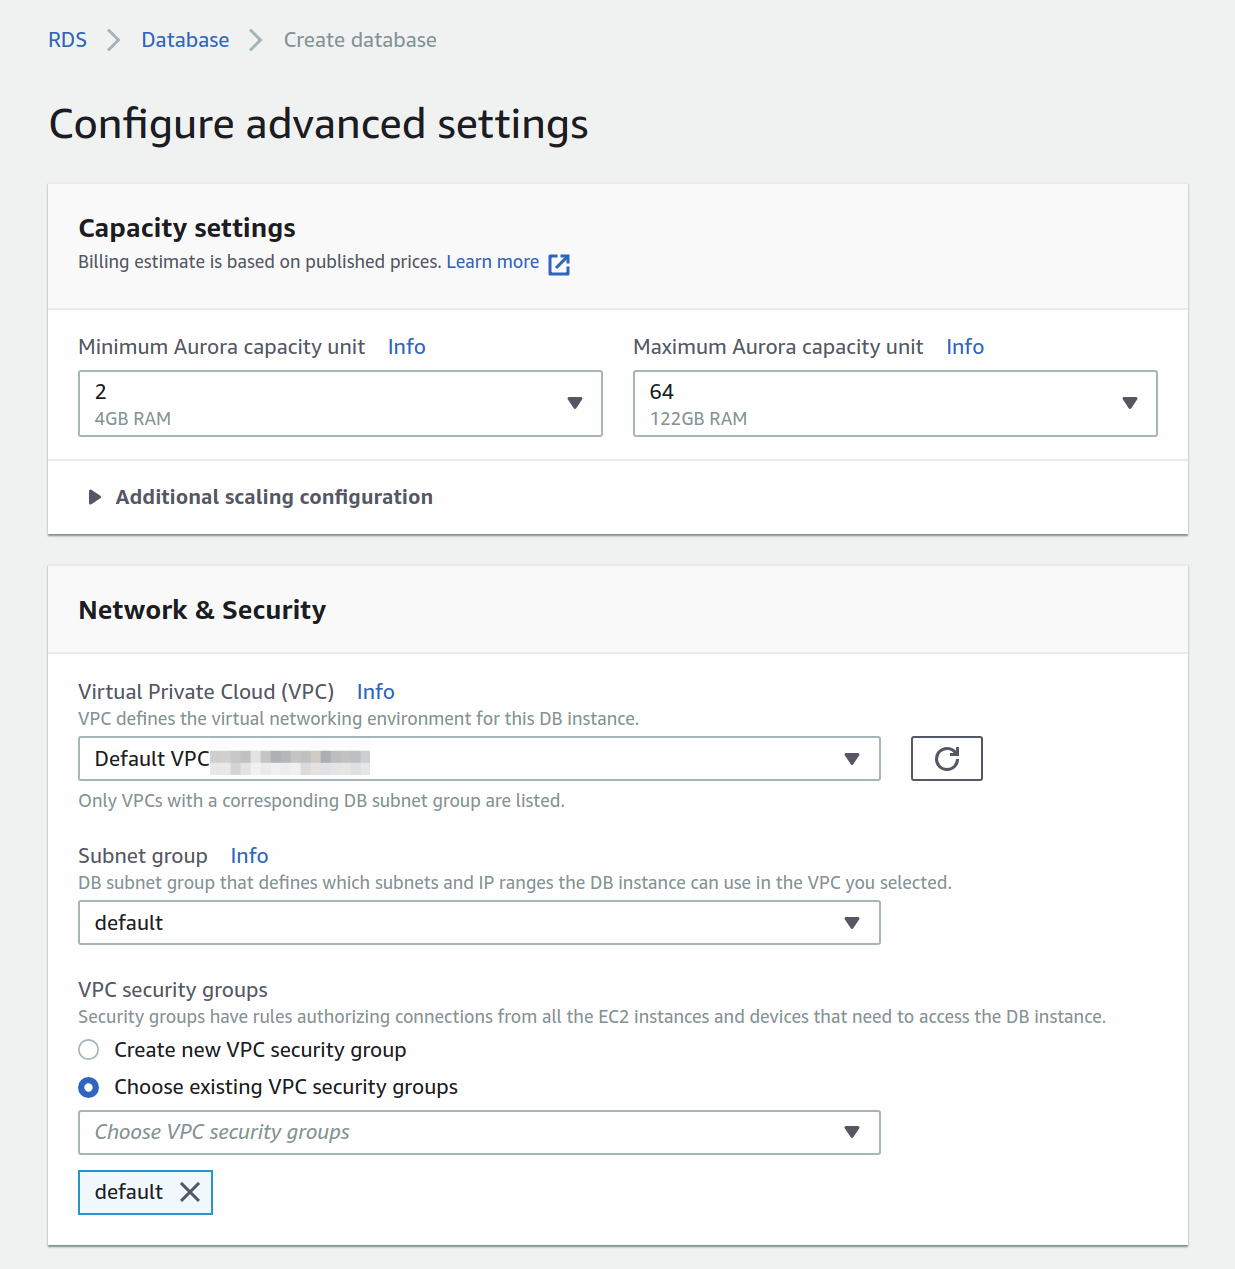
Here you'll set up the capacity and network. Because Aurora Serverless lives inside a VPC you'll have to configure the access. Here you're choosing the default VPC.
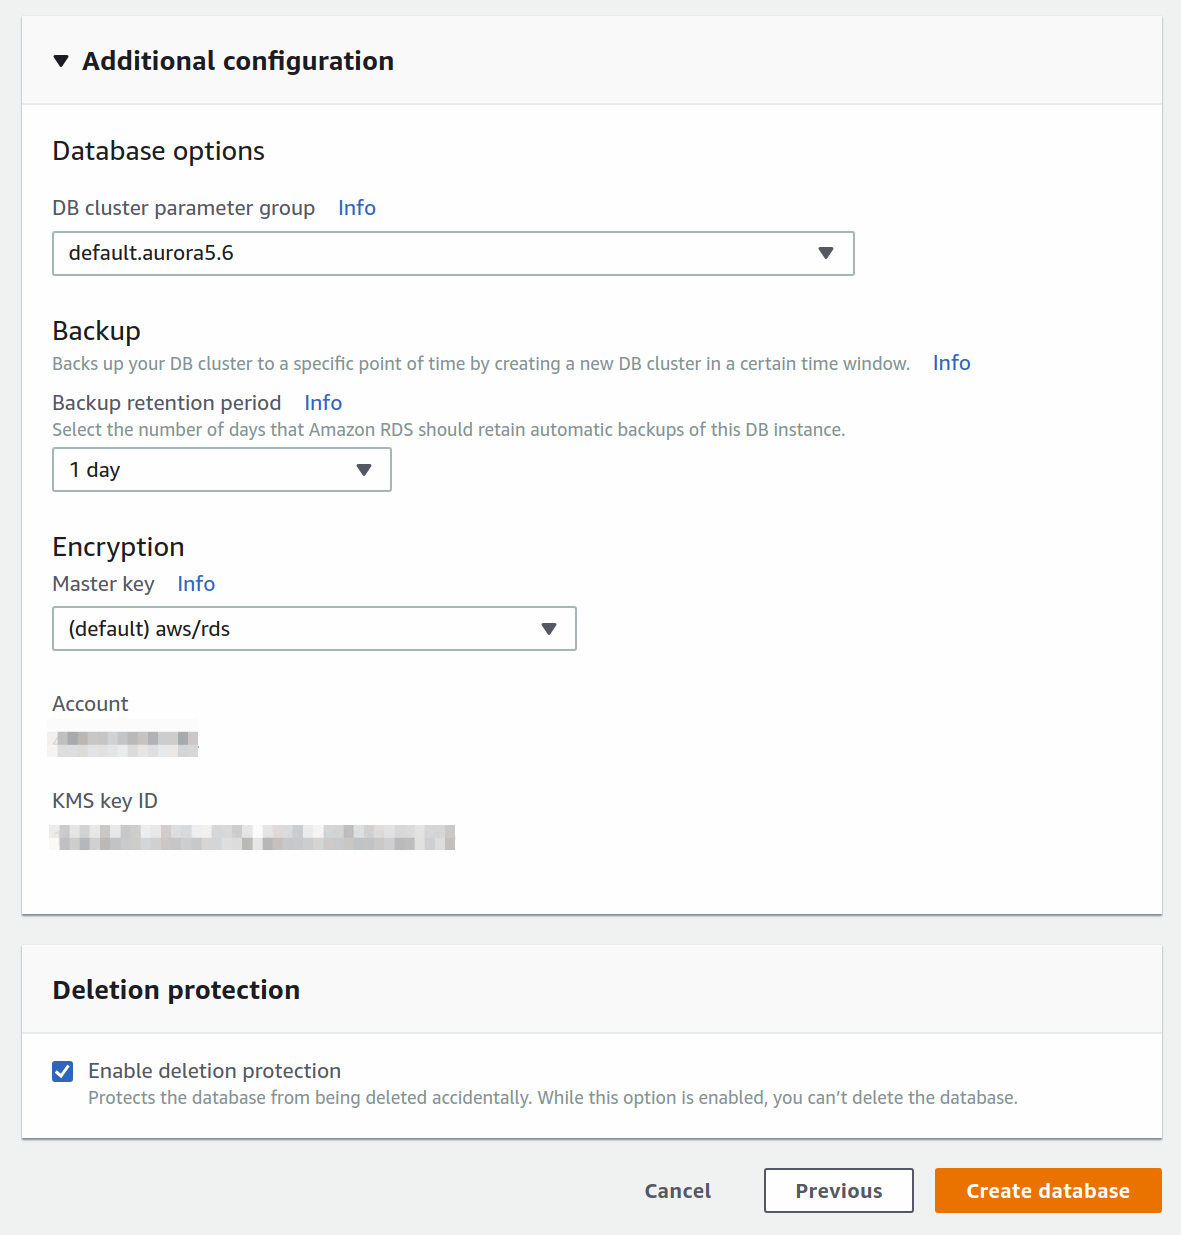
With the additional configuration, you can set up backups of you so please. Once you're happy with it all, press the orange Create database button.
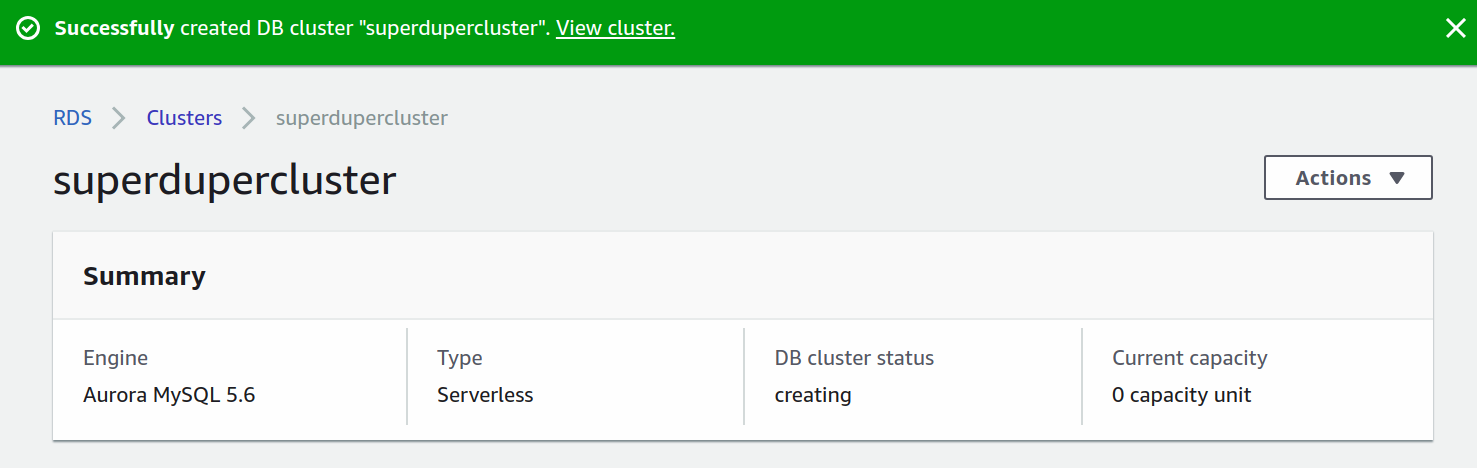
Finally, it'll start provisioning the cluster. You'll get redirected and see some output looking like this.
But, what's interesting to us is the details section.
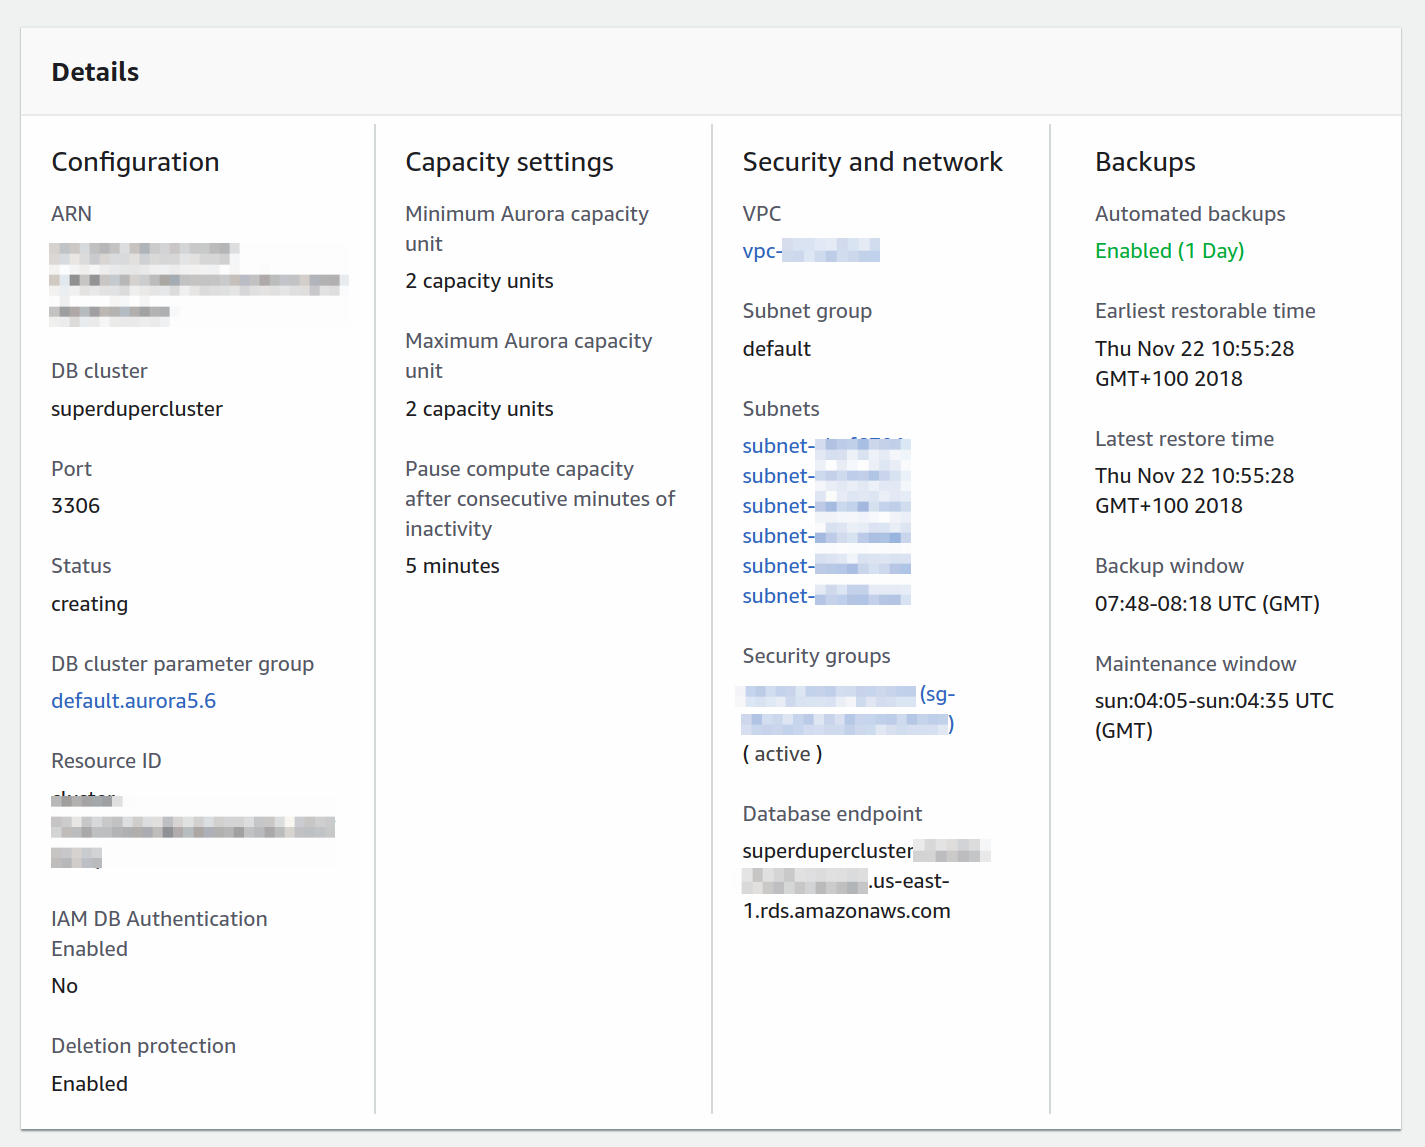
Here you have access to security groups and subnets. You'll need to add them to the AWS Lambda functions in order for them to be able to communicate with the database. More about that in the next section.
Note: If you want to access the AWS Aurora Serverless cluster follow this tutorial to learn how to do it with the CLI, or this official tutorial by AWS to connect through Cloud9. You will need to connect to the cluster and create a database manually because Sequelize can't create them for you.
The engineers over at Statsbot have shown me how awesome AWS RDS can be with the huge amounts of data they're processing. Rumors are they're in the works of creating a completely serverless open-source analytics framework called Cube.js. I'm eager to start using it myself. Hopefully, Aurora Serverless can be of help.
Writing code
Configuring database resources on AWS is always a handful, especially the new serverless database offering. Luckily, the configuration part is over. Now we need to write the configuration for our serverless resources in the serverless.yml file and add the actual CRUD methods to the handler.js.
4. Configuring the YAML
The Serverless Framework helps a great deal with setting up the initial project structure. It can scaffold out pretty much everything you need when you're starting out. Jump back to the directory where you created the serverless project and open it up in your favorite code editor.
Open the serverless.yml file first and take a breather. Here you'll see a bunch of comments with sample configurations. I like clean code, so let's delete it all, and paste in this snippet instead.
Let's break it down piece by piece. The provider section contains all the basic info about the cloud provider. But also data about the runtime, function timeouts, environment variables, and VPC configuration. The VPC setup is needed here because AWS Aurora Serverless can only run behind a VPC, so you need to put your AWS Lambda functions in the same VPC in order to access the database.
Moving on, there's a custom section at the top where we load environment variables and then pass them to the environment section.
Finally, let's talk about the functions section. We added a total of 6 functions: healthCheck, create, getOne, getAll, update, and destroy. They all point to identically named exported functions in the handler.js file. Their event triggers are hooked up to HTTP events which are handled by AWS API Gateway. Meaning, an HTTP request to a specified path will trigger the referenced function.
That’s pretty much it, the last thing is to add a plugins section and serverless-offline. We installed this module above and we’ll use it for testing the service out before deploying to AWS.
5. Adding secrets
You saw in the serverless.yml that we referenced a secrets file. Before moving on we need to create it and make sure it's loading our secrets correctly.
In the root of the project create a secrets.json and paste this snippet in.
This setup will work perfectly fine for a local development environment. Once you want to deploy it to AWS you'll have to add your own secrets. AWS Aurora Serverless will output everything like in the image above. The important secrets here are the database connection parameters, security group ID and subnet IDs.
That's everything regarding the YAML. Let's play with the handler.js next. Finally, some real code!
6. Fleshing out the functions
To start out we'll define 6 functions. They'll describe the initial layout and behavior we want. Once that's done, we'll move and create the database connection and database interaction logic with Sequelize.
Switch over to the handler.js file. You’ll see the default boilerplate. Guess what? Delete it all and add the code below.
I can understand you think this is a bit of a huge snippet. Don't worry. These are only 6 basic async functions. The connectToDatabase() function resolves to an object containing all the database models. We'll only implement the Note model in this tutorial. The logic behind the function will connect to the SQL database, cache the connection and make sure to never retry connecting if an existing connection is alive.
But wait, we haven’t defined or created any of this. Well, I did it on purpose, I first want you to see that this is not that complicated, nor any different from creating an API with Node.js and Express.
7. Adding the database connection
Adding the database connection is our next step. When an AWS Lambda function is invoked for the first time, which is called a cold start, AWS will spin up a container to run the code. This is when we connect to the database. All subsequent requests will use the existing database connection. Conceptually, it’s rather easy to understand, but a handful when we need to wrap our heads around it in the code. Here goes nothing!
Create a new file in the root directory of the service, right alongside the handler.js. Give it a pretty logical name of db.js, and add the code below.
At the top, we're requiring Sequelize and the NoteModel.
Note: We're yet to create the model, but hold on, we'll get to that right after this part.
We then initialize sequelize, pass in the connection variables and establish a connection. Calling NoteModel will initialize the model, which we then pass to a Models constant. The arbitrary connections object is there just to use as a cache for the connection. Making sure not to sync the database if it's not necessary. The second reason for awaiting the .sync() and .authenticate() methods are to make sure the database connection is established during the initial function call, before handling any business logic.
With the db.js file created, let’s require it in the handler.js. Just add this snippet to the top of the handler.
8. Adding a Note model
Jump back to the handler.js. You can see we’re calling const { Note } = await connectToDatabase() in the functions to retrieve data, but there’s no Note model defined. Well, now is as good a time as any.
Create a new folder in the service root directory and name it models. In it create another file and name it Note.js. This will be just a simple model definition.
That’s it. Time to try it out.
Note: Make sure to add your secrets.json to your .gitignore file.
How about some testing?
We’re ready to test the API. To be sure, let's start by running it all locally. One tiny thing to take into account is that there’s a flag we need to add while running serverless-offline.
Note: Serverless Offline invalidates the Node require cache on every run by default, we add this flag to disable it. In Node.js when you require() a module, it stores a cached version of the module, so that all subsequent calls to require() do not have to reload the module from the file system.
Once you've run the command in the terminal, you should see something like this.
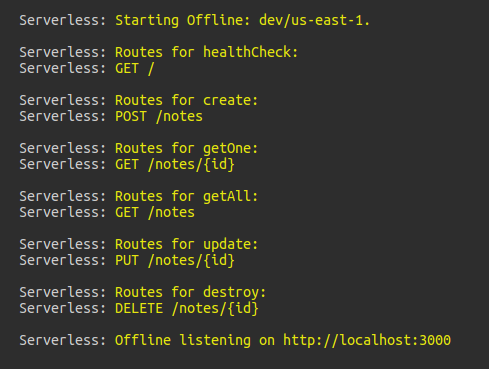
All our routes are up and running. Using Insomnia, I’ve created a POST request to http://localhost:3000/noteswith a JSON body.

Checking the terminal you can see => using new database connection get logged, meaning the initial database connection has been established. Send another POST request and you’ll see => using existing database connection get logged instead.
Awesome, adding a new note works. Let’s retrieve all the notes we just added using the getAll method.
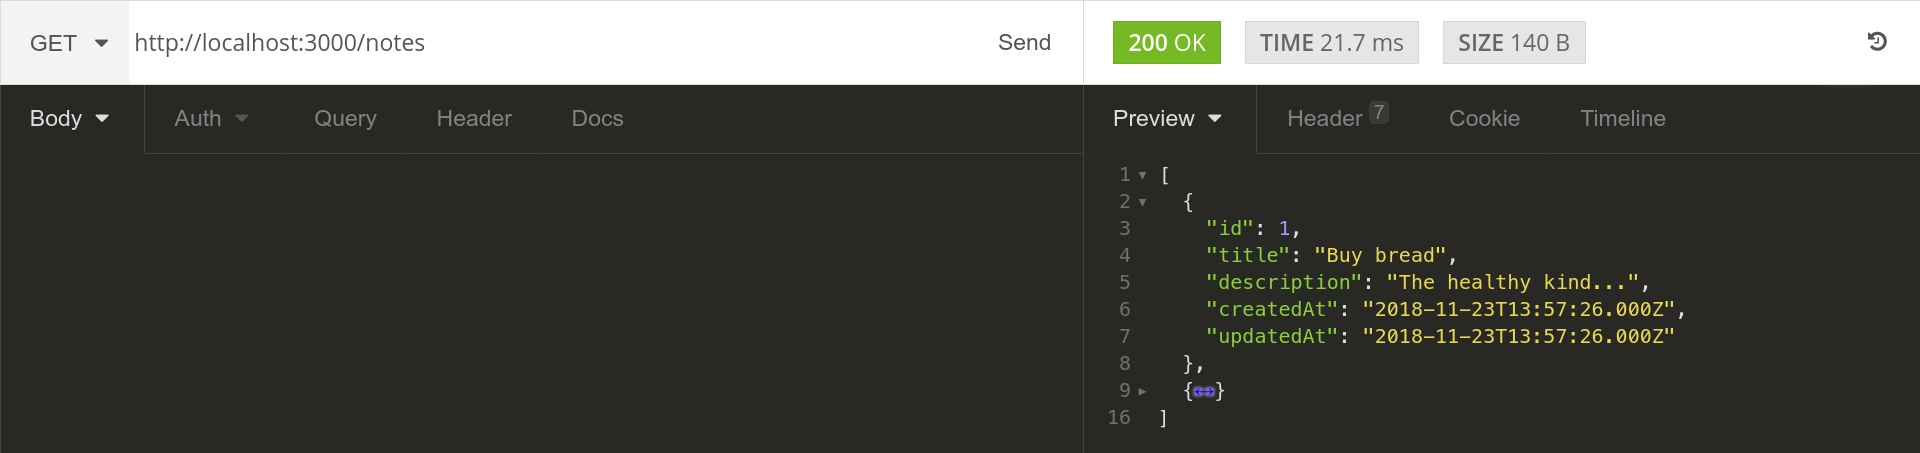
Try out the other endpoints yourself. Come back here once you're done playing.
Deploying to AWS
Now comes the tricky part. Make sure to write down all the database parameters you'll get in the AWS Aurora Serverless console, and of course the security group ID and subnet IDs as well. Usually, you'll have one security group and three subnets. But, it can vary, so don't worry. After you have the values, add them to your secrets.json. That's it! You're ready to deploy.
The Serverless framework makes deployments quick and painless. All you need to do is to run one command.
It will automagically provision resources on AWS, package up and push all code to S3 from where it will be sent to the Lambdas. The terminal should show output similar to this.
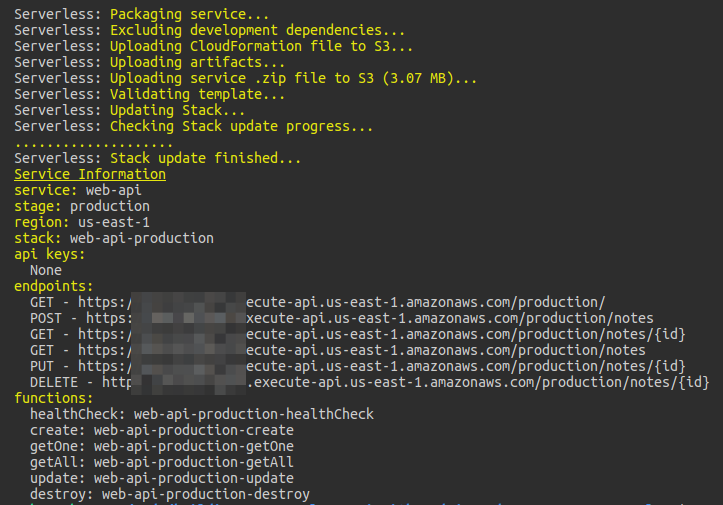
Note: You can repeat the testing process from above with the endpoints provided. But, be patient with the cold-start times. AWS Aurora Serverless can take a decent 10 seconds to start. A similar issue happens with AWS Lambda in a VPC.
That’s all there is to the deployment process. Easy right? This is why I love the Serverless framework so much.
Wrapping up
This is an ever-evolving architecture. With the rise of a serverless relational database, the possibilities are endless in creating entirely serverless infrastructure. I’ve tried my best to explain the process of creating a proper API. Hopefully, you've learned a lot. Enjoy digging deeper into the possibilities of serverless architecture and all that comes with it!
And, of course, here's the repo once again, give it a star if you want more people to see it on GitHub. If you want to read some of my previous serverless musings head over to my profile or join my serverless newsletter!
I had an absolute playing with AWS Aurora Serverless. Hope you guys and girls enjoyed reading it as much as I enjoyed writing it. If you liked it, slap that tiny unicorn so more people here on dev.to will see this article. Don't forget to give the peeps at Cube.js some love if you need a serverless SQL analytics framework! Until next time, be curious and have fun.